Monday, May 30, 2011

Chicken fried ribeyes

When you love chicken fried steak the way I love chicken fried steak, you find plenty of variations of the classic to cook. And while the super-economical cube steak works just beautifully, sometimes you want something a little more special.
For those occasions, you just can’t beat a chicken fried steak featuring one of the middle meats (those delicious cuts coming from the rib, loin or sirloin). Tonight, I decided to make chicken fried ribeyes with cracked pepper gravy, rolls, green beans (for the Mr.) and salad (for me). To make the chicken fried ribeyes, you’ll need:
(2) thin-cut ribeyes  
Flour seasoned with coarse sea salt, coarse black pepper and garlic powder to taste
1 cup buttermilk
1 cup beer
2 eggs, slightly beaten
Peanut or vegetable oil
Mix the wet ingredients in a pan or dish. I used the bottom half of a rectangle-shaped Tupperware container.
Dredge the steaks one at a time into the seasoned flour, and then into the wet mixture and then back into the flour. Place the battered steaks on a plate and put them in the fridge for 15 minutes or more.
When you’re ready to start cooking, heat your oil in a heavy skillet to medium-high heat. You know the oil is hot enough when a piece of flour rises to the top right away.
Carefully add the steaks to the hot oil. Fry until golden brown on one side, turn and repeat. Depending on the size of the steaks, they’ll probably take about 10 to 12 minutes to cook. Drain on paper towels and cover in cracked pepper gravy if desired. (In case you missed it, the gravy recipe is here.)
Our dinner looked like this, minus my salad which didn’t stick around long enough to make the photo shoot (What can I say? Sometimes I get hungry when I'm cooking.):

Wednesday, May 25, 2011

WebLove: Steak Art

How cool is this print? If I had any wall space in my kitchen, I would order it at once, but I guess it’ll have to wait until we move out of the bachelor pad and I’ve got a little more decorating space. (I think it might look a little weird in the bedroom, and it’d only make me hungry hanging in my office.)
New York Strip BUTCHERSHOP MEATS Hand Printed Letterpress Poster

Tuesday, May 24, 2011

Oven-roasted Cajun corn

I just love corn! On the cob, off the cob, cream-style or in Grady Spears’ Corn Casserole, you just can’t beat it.
This is a quick and easy way to prepare fresh corn on the cob. While I also like cooking corn in the husks, this method saves a little time and labor (if you buy it already out of the husks, that is) and allows you to cook it in butter and spices for a great flavor.
Here’s what you’ll need for 2 servings:
2 cobs of fresh sweet corn, with husks removed
2 squares of foil, large enough to wrap one cob in each
Butter, margarine or spread
Tony Chachere’s Original Creole Seasoning*
Preheat oven to 350 degrees.
Place each cob on its own piece of foil.
Cover the top side of each cob in butter (to your liking) and sprinkle generously with the Creole seasoning. Wrap them up and place in the oven. Cook about 30 minutes. If desired, you can then open the foil packages up and broil for a few minutes to brown them up just a little.
*If you don’t like Cajun spices, feel free to experiment with your own favorites. Sometimes I’ll alternately use a blend of sea salt, coarse black pepper and cilantro.
Tonight, I served this corn with Rachael Ray’s garlic grilled skirt steak with bread salad. Minus the tomatoes, because neither of us like tomatoes (unless they’re in ketchup, salsa or pizza/pasta sauce, of course). I also used some chunks of French bread (from a baguette) instead of the rolls. I cut the recipe in half since there's only 2 of us, and tonight's entire meal for 2 cost only about $9. It looked like this:

Have you found us on Facebook?

If you enjoy Make Mine Beef and you’re on Facebook, I’d be honored if you'd like us (there's even a handy little like button on the right-hand side of this page). In the few days the blog has had its own Facebook page, we’ve already grown to about 65 likes. Once we hit 100, I plan on celebrating with a little giveaway, so be sure to check it out and tell your friends!

Monday, May 23, 2011

Text from a friend: T-bone salad

I just love swapping recipes among friends, so I was super excited when a dear friend sent me a text message this evening with the following:
“One for your blog :) Leftover T-bone [on top of a] salad with sweet red peppers and a balsamic/Worcestershire vinaigrette dressing.”


Looks delicious! Thank you for sharing, B!

Nothing says thank you like beef

My husband is the best.
A couple of weeks ago, when I pitched this half-crazy plan to him — a plan that included cashing in 50,000 frequent flyer miles for 2 crazy late night/early morning flights, gambling on a Priceline hotel and using a rental car discount all so I could see the second leg of the Triple Crown from the grandstands at Pimlico he said, “Let’s go!”
And even though we experienced more than our fair share of travel woes during our 42-hour Maryland adventure, only spent about 8 total hours in the hotel over a 2-night stay and spent an hour or more just trying to find our seats at the track, he was a complete trooper and was excited for me as I anxiously awaited the 12th race.
The Mr. and me at Pimlico

For me, a total horse racing junkie, seeing that race up close made all of the travel-related hassles and sleep deprivation more than worthwhile. But, just in case that wasn’t enough for him, I wanted to make him a very special “thank you for being awesome” dinner. And nothing says thank you like a big chunk of well-marbled beef!
(As a side note, I had one of these for dinner, but tonight’s blog is all about his special meal, so we’ll skip to the main event. Which, by the way, would also make a nice prime rib dinner for 2 if you were so inclined.)
I started out with a 2-pound bone-in ribeye.
I gave it a good rubbing of garlic pepper and coarse black pepper and prepared a cast iron skillet with enough olive oil to just barely cover the bottom.
Once the skillet was good and hot, I added the steak and seared it for about 4 minutes on each side. Then, since it’s essentially a 1-rib rib roast, I transferred the skillet to a 400-degree oven and rotated the steak to where it was fat-side-up  to let it cook as such.
Internet research directed me to cook it for about 10 minutes at 400 degrees, and then about 20 more minutes at 225 degrees. This wasn't nearly enough, though, so I ended up cooking it about 30-40 minutes at the lower temperature to get it to the rare-to-medium rare doneness the Mr. prefers. And, even if it means serving your side dish as an appetizer (which I may have done), I firmly believe it's better to undercook than overcook. You can always toss it back in the oven/back on the grill, but there's no turning back if it's too done! 
Once it was done I thought it was done, I transferred the steak to a warm plate and let it rest for about 5 minutes while I cooked one of the Mr.’s favorite side dishes, something my mom taught me to make that I like to call cheesy squash.
Here’s what you’ll need to make Mom’s cheesy squash:
1 large piece of yellow squash, sliced
1-2 tablespoons unsalted butter
Shredded cheddar cheese
Salt and pepper
Here’s what you do:
Heat a non-stick skillet to medium high.
Melt the butter.
Add the squash and season with salt and pepper.
Cook until brown, about 5 minutes.
Add the cheese and cook until it melts.
Here’s what his dinner looked like, minus the German chocolate cake and ice cream he'll get for dessert later:

Thursday, May 19, 2011

WebLove: Girls Can Tell

When I saw the Carnivore Dish Towel on Anthropologie’s Facebook page last night, I just had to check out the company that makes them. I was delighted to find other meat lover-inspired goods on their website and had to show them a little WebLove. Enjoy Girls Can Tell!
Here are a couple of my favorite items:


Beef buying basics: The most bang for your buck

There’s no doubt beef is the protein most associated with special occasions or fancy white tablecloth meals. (Have you ever heard of anyone celebrating a big promotion with a chicken breast? Me either.) But beef doesn’t have to be reserved as a once-in-awhile treat — there are plenty of ways to enjoy it several times per week and still stick to your shopping budget.
Here are a few ways I cook a lot of beef each week without having to scrimp on, say, detergent (I can’t help it — my mom raised me on Tide and it's a hard habit to break):
Watch the specials.  This is especially key when buying your higher-end steaks. Since I like to buy thicker, Choice or better steaks, they usually end up being my weekly splurge. But by keeping an eye on specials in the grocer's ads and in-store (and being open to different cuts), sometimes I can get some really good deals on the highest quality beef.
Stock up when there’s a deal. The beauty of beef is it freezes nicely for a good 6 months. If there’s a good price on one of our favorite cuts, I will buy several steaks at a time and freeze what we’re not planning on cooking that week.
The flat iron. Have you ever had a flat iron steak? This relatively new cut is the second-most tender cut of beef (behind the tenderloin) and generally much less expensive.
Don’t be afraid of the thrift. Ever seen those packages of beef marked “thrift” or similar because they’re nearing their sell-by date? They may look a little different, but they’re still perfectly good as long as you plan on cooking or freezing them soon. I’ve gotten some great deals on beef that’s been looked over!
Cook once, eat twice. By cooking a little extra, you can have 2 meals (or more) off the same meat. Extra steak makes a great sandwich, salad or quesadilla ingredient and extra taco meat can mean crispy tacos for dinner, soft tacos or nachos for the next day’s lunch.
Ground beef. It’s not only affordable, but it’s super versatile! I regularly use ground beef to make hamburgers, tacos, empanadas, lasagna and a host of other meals.
And, while I’m on the subject, I’d be remiss if I didn’t recommend a great blog on this very topic. Beef on a Budget has some great recipes for affordable and delicious beef meals. Be sure to check it out for more inspiration!

Tuesday, May 17, 2011

Mom's onion rings

These onion rings have to be one of my mom’s specialties. They’re so good I could easily make a meal off of them, but, as you can imagine, they are a great on the side of a juicy steak or hamburger. Tonight, I’m serving them with burgers — the Mr.’s is a big, 2/3 pound, 3-cheese bacon burger with barbeque sauce and for me, a smaller, more traditional burger topped with Miracle Whip and lettuce.
These take a little more time than the usual side dish, so they aren’t in my regular weekly rotation. They are a once-in-awhile treat. But, they are actually quite easy and require limited ingredients. Tonight, I’m making enough for 2-3 large servings.
To do the same, you’ll need:
1 red onion, cut into slices and separated into rings
About 3 cups buttermilk
3 eggs
Flour
Sea salt
Coarse ground pepper
Vegetable oil
Place the onion rings into a mixing bowl and fill it with ice and water. Let them sit for 10 minutes up to several hours.

Spread some flour (I probably use more than I need, but it seems easier to have some extra to work with) on a large plate and season it up to your taste with the salt and pepper. We like quite a bit of pepper, so my flour looks something like this:

In a medium-sized mixing bowl, mix the buttermilk and eggs. It’s not an exact science, so I don’t measure but just kind of eyeball it.
Dredge the onion rings into the flour, into the buttermilk and back into the flour. Transfer to a plate and put in the refrigerator until ready to fry. This will help the batter to stick a little better, and allows you to do your prep work ahead of time (and, if you’re like me, clean up the huge mess you just made before it’s time to start cooking).

Heat oil in a heavy skillet or deep fryer until a piece of flour rises quickly to the top. I’m told this is at about 350- to 375- degrees, but I’ve never measured. The flour trick works like a charm!
Slowly place onion rings in skillet or fryer, being careful not to overcrowd them.  If you’re using a skillet, you’ll need to turn them at least once. Cook about 5 to 7 minutes per batch, or until golden brown. Drain on paper towels and serve with ketchup or Ranch dressing.

Monday, May 16, 2011

WebLove: Not all fat is bad

Lots of consumers are looking for lean protein sources these days, and with 29 cuts that meet the government’s definition of lean, beef is a delicious option! But, sometimes, in the search for lean beef, consumers miss out on the best eating experience because they think all fats are created equal and pass up the Choice or Prime beef for fear it's hard on the waistline. 
That’s simply not so, and my friends over at the Black Ink blog do a great job of busting that myth today in this post.
In related news, the Mr. and I enjoyed a great example of some well-marbled (but still lean) strip steaks tonight.  I served them with twice-baked potatoes and had enough of my steak leftover to make a strip steak sandwich for lunch tomorrow. Yum! Our dinner looked like this, except not sideways (Blogger is being a little contrary tonight, but you get the idea):


WebLove: Rachael Ray's grilled beef recipes

I just love celebrities who love beef! Today, during some lunch hour Internet browsing, I saw Rachael Ray (love her!) was promoting her grilled beef and steak recipes in honor of the upcoming Memorial Day weekend and just had to share this link with y'all!
These all look great, but I think the grilled garlic skirt steak with bread salad (sounds like my kind of salad!) will be first on my list to try!

Sunday, May 15, 2011

Not-so-homemade homemade hamburger pizza

I’m pretty sure I can’t call this a recipe. It’s more my favorite way to make a quick and delicious meal using a bunch of stuff that’s already made, plus some meat.
But, I do feel it’s worth sharing since it is a quick and easy way to use the ever-versatile ground beef. Feel free to add your own ingredients (sometimes I add some shredded parmesan cheese to the mozzarella, or a little crumbled-up microwaved bacon for a hamburger and bacon pizza) but know it’s pretty yum-o as is!
Here’s what you’ll need:
1 Boboli pizza crust
½ pound ground beef
Garlic salt
Pepper
Ragu Pizza Quick sauce
Shredded mozzarella cheese
Preheat oven to 450 degrees.
Brown hamburger meat seasoned with garlic salt and pepper. I like to crumble it up pretty small and cook it at a high enough temperature where it’ll get just a little crispy, but it’s totally a personal preference.
Place crust on a baking sheet covered with foil or a pizza stone. Spread with pizza sauce.
Once meat is done, add to pizza then sprinkle with cheese. Bake for 10-12 minutes.
And then you'll have something like this:

Cook once, eat for days: Kathy's lasagna, slightly modified by Cindy

This recipe is known in my family as Kathy's Lasagna (Kathy being my aunt), but the version I make has a couple of slight modifications that originated in my mom's (Cindy's) kitchen. Hence the long blog title. But, whatever you call it, I'm told it's just about the best lasagna ever.
(I say "I'm told" because I don't technically eat noodles, so I don't technically eat this. But I still make this regularly because the Mr. loves it and even if we have friends over, he can eat on this for a couple more days which makes the week's cooking pretty easy. I'll often cook this and a homemade pizza for me on the same night and we can both eat leftovers for a couple of days. Win-win-win, as Michael Scott says. And, I might just be sharing my super easy hamburger pizza "recipe" next. If you can call something with so many convenience items as ingredients a recipe, that is.)
Kathy's lasagna, slightly modified by Cindy
1.5 lb ground beef
1-2 small handfuls of frozen chopped onions 

1 tsp parsley
1 tsp salt
1 tbsp pepper  (or 1 tsp for a less spicy version)
1 tsp basil
1 tsp oregano
1 tbsp crushed red pepper (or 1 tsp for a less spicy version)
1 tbsp garlic salt (or 1 tsp for a less spicy version)
1 box lasagna noodles (prepare according to package, or buy the ready-to-bake ones like I do)
2 - 8 oz cans tomato sauce
1 large can petite diced whole tomatoes, undrained
1 lb Philadelphia cream cheese (whipped is easier to use; you'll just dollop it on)
1.5 lb mozzarella cheese
1 small can Parmesan cheese (you won't use the whole thing)
Start by browning the meat and onions. Add all seasonings, 2 cans of tomato sauce and whole tomatoes.  Simmer for at least 30 minutes. The longer it simmers, the better!
Preheat oven to 400-degrees.
In a disposable giant lasagna pan, layer noodles, layer meat, layer each cheese. Repeat with more noodles, meat and cheese. Make sure the cheese is spread all over the top of the dish to completely cover all noodles.
Bake until bubbly, about 25- to 35- minutes. (In my oven, it takes closer to 35- to 40- minutes. I should really pick up an oven thermometer, though... You'll be able to tell when it's done.)
It should look something like this:

This is one of those dishes that is just as good or better warmed up the next day (or a couple of days later) in the microwave. Cook once, eat for days!

Friday, May 13, 2011

Fun Fact Friday: The most valuable trophy

Who doesn’t love a little trivial knowledge? In the first installment of what I hope to be a regular feature on Make Mine Beef, today’s Fun Fact Friday is focused on my favorite sport, horse racing.
That’s right — the most valuable trophy in North American sports isn’t awarded at the Super Bowl or BCS National Championship Game. It’s not even the super cool, super historic Stanley Cup. It’s the Woodlawn Vase, the official trophy of the Preakness Stakes. According to the event’s Facebook page, the roughly 30-pound sterling silver trophy was valued at more than $1 million in 1983. It’s likely worth closer to $4 million today. Here’s an interesting piece on the history of the vase.
And, here’s a close-up picture of the vase being raised by Bob Baffert, the trainer of last year’s Preakness-winning Lookin at Lucky.

So, in honor of my first Fun Fact Friday and my first trip to a Triple Crown race (we leave next Friday, after work!), I thought I'd leave you with a recipe for the Black-Eyed Susan, the official drink of the Preakness Stakes.


Tuesday, May 10, 2011

Katrina's quesadillas

These beef fajita quesadillas have quickly become a favorite around here because they are so quick and so good. They don’t even require a side dish, but if you’re feeling extra domestic, feel free to put out some chips and salsa and call it good.
By slicing the beef before cooking it, the cooking time is decreased dramatically. And, if you’ve got a family-size griddle like mine, you can griddle 2 quesadillas at once. The whole meal can easily be cooked and ready to eat in 20 minutes or less (even faster if you use some leftover beef from the night before)!
Before we get started, I’ll throw in a little note on my preferred choice of beef for this dish — flank steak. It’s an economical cut with a ton of flavor that also meets the government’s guidelines for lean. However, it’s also one that requires a little marinating for the best eating experience. But you know what? It’s worth it! When it’s all said and done you’ll get a nice, tender piece of meat out of the deal that has an exceptional flavor. I like to beat on it a little with a meat mallet (optional step but great for taking out any aggressions) and then marinate it for a few hours or overnight, whatever best fits my schedule. Let’s get started with that step. You’ll need:
1-pound flank steak, cut into strips (always cut across the grain)
3 cloves of garlic, smashed/peeled and minced
Lime juice (I use the stuff that comes in the little green bottle)
Vegetable oil
Toss the flank steak strips and garlic into a Ziploc bag. Give it a good squirt of lime juice and add about a lid full of vegetable oil. Shake the bag up and put it in the fridge until you’re ready for it.
Fast forward to dinner time…
You’ll need your marinated steak, plus:
4 flour tortillas
Mexican blend shredded cheese
Butter, margarine or spread
Nacho sliced pickled jalapeños
Fajita seasoning (Fiesta brand is my favorite)
Remove the steak strips from the bag and pat dry. I like to leave the garlic chunks with the beef and cook those up (and include them in the quesadillas), too. If you’re not a big fan of garlic, just toss them out with the marinade. I promise it won’t hurt my feelings. Sprinkle with fajita seasoning on both sides.
Spray a skillet with non-stick cooking spray and heat to medium-high heat.
Once it’s good and warm, add the steak and garlic and cook to desired doneness.
While that’s cooking, get your other ingredients ready:
Butter one side of each of the 4 flour tortillas.
Take several jalapeño slices out of the jar and cut them into 4 to 6 pieces each.
Once the steak is almost done, heat up your griddle to 350 degrees.
Once the steak is done, remove it from the heat. Take one of the tortillas and cover the non-buttered side with steak, cheese and jalapeños. Top it with another one of the tortillas (buttered side out, like you’re making a grilled cheese sandwich) and flip onto the griddle. Repeat for the second quesadilla.
Cook until brown on one side and then flip. If the cheese isn’t quite melted to your liking by the time both sides brown, turn the heat down and let it melt a little more.
Remove from the heat and cut each quesadilla into 4 pieces.
It should look something like this (the Mr. gets a larger portion that I do):

Friday, May 6, 2011

Steak fingers with Grady Spears' Cracked Pepper Gravy

Steak fingers are one of those perfect foods that are just as good as part of a hot dinner as they are cold out of the fridge the next day. Consider them the more portable, faster-frying cousin to the chicken fried steak. These are good plain, but today I’ll be serving them up with Grady Spears’ cracked pepper gravy.
Like many of you, I learned how to make gravy the old-fashioned way — with a little grease, flour and milk. And while that is, of course, delicious, once I tried Grady’s version I haven’t gone back. My reasons are three-fold: (1) this gravy is ultra-consistent — every single time I make it, it takes the same amount of time and comes out looking and tasting the same; (2) since it doesn’t rely on grease, you can start it while your meat is still frying and get everything ready at the same time; (3) it’s awesome. The first time I made it at my parents, my dad dubbed it “professional” gravy (I made some joke to the effect of "and therefore it can't be served in the Olympics," but I digress...) but I don’t want to take anything away from Grady Spears, so I’ll try to remember to refer to it by its given name in my blog.
To make steak fingers for 2-3 people, you’ll need to start out with the following:
1 package of 4 cube steaks
Flour seasoned with coarse sea salt, coarse pepper and garlic powder to taste
1 cup buttermilk
1 cup beer
2 eggs, slightly beaten
Peanut or vegetable oil
To make Grady Spears’ Cracked Pepper Gravy, you’ll need:
½ stick of unsalted butter
5 tablespoons flour
4 teaspoons coarse ground pepper
1 teaspoon sea salt
2 ½ cups whole milk

To start out, I place the cube steaks, one at a time, on a cutting board and cut them in to strips. You can usually get about 3 strips per cube steak, but they vary so just use your own judgment. Uniformity isn’t important. (Not to me at least!) I then mix my wet ingredients in a mixing bowl and arrange the steak strips and wet ingredients near the seasoned flour. I would say it makes less of a mess this way, but I pretty much make a huge mess any time I cook.

Dredge the steak strips, one at a time into the flour, then the wet mixture and then back into the flour. Pile them on a plate as you finish. I like to do these a little ahead of time when possible because putting the plate back in the fridge for 10 minutes to an hour or so helps the batter adhere a little better.
When you’re ready to start cooking, heat your oil in a heavy skillet to medium-high heat. You know the oil is hot enough when a piece of flour rises to the top right away.
Add the strips to the oil one at a time, being careful not to crowd them. I usually break one package of cube steak into two batches. Fry until cooked throughout and crispy and then drain on paper towels. Depending on the size of the strips, it usually takes about 8 to 10 minutes for a batch to cook.
When they are done, they’ll look like this:

A couple of minutes before putting the last batch in to fry, you’ll want to start on the gravy. I like to have all of my ingredients out and together like this (Aren’t those little half sticks of butter cute? Thank you, Land O’Lakes!):

Melt the butter on the stove on medium heat.
Then, add the flour and whisk. It’ll look like this:

Then, slowly add the milk, whisking as you go to avoid lumps.
Next, add the salt and pepper.
Cook for about 10 more minutes on medium heat, whisking enough to prevent lumps but not so often to prevent the gravy from thickening properly. When it’s nice and thick, you’re done!
And voilá — the finished product:

Thursday, May 5, 2011

Steakhouse classics: strip steaks and baked potatoes

There are a lot of ways to prepare a good steak — grilling, pan broiling or frying on the stove, in an oven or even on a griddle. And, from time to time I use all of these methods. But, today I’m going to share with you my very favorite way to cook a steak these days — in a cast iron skillet with a touch of melted butter. It’s quick (you don’t have to wait for the grill to heat up), it makes for a beautiful crust and it’s delicious.
Plus, if you’ve got side dishes cooking in the house (or are trying to finish up the laundry or last week’s episode of Grey’s Anatomy on the DVR) you don’t have to frantically run back and forth from the porch to the kitchen.
And since you’d be hard-pressed to find a side dish that goes better with steak than a good old baked potato, I’m going to show you how I make my favorite version of the classic.
Since the potatoes take longer to cook, we’ll start there.
Begin by gathering up the ingredients — washed baking potatoes, a spray can of EVOO and some coarse sea salt.

Preheat the oven to 350 degrees. Cover a cookie sheet in foil. Place the potatoes on the cookie sheet and spray them all over with the olive oil. Then, give them a good dusting of coarse sea salt. Don’t worry if it goes all over the sheet, you can let those strays cook up with the potatoes and use them to season your cooked potato, if desired.

Also, it’s important to know that the temperature isn’t all that important to baking potatoes. If you need them a little faster, or have something else cooking in the oven that requires a higher temperature, just decrease the cooking time. Or, if you need the oven set at a lower temperature, just add a little time. An average sized potato will be done in a couple of hours at 350.
It’s also noteworthy that you can decrease the cooking time substantially if you start them out in the microwave for a few minutes. Just make sure you poke a couple of holes in them with a fork first, and wait to season them until after they’re out of the microwave.
Now that our side dish is taken care of, let’s move to the center of the plate — the steak!
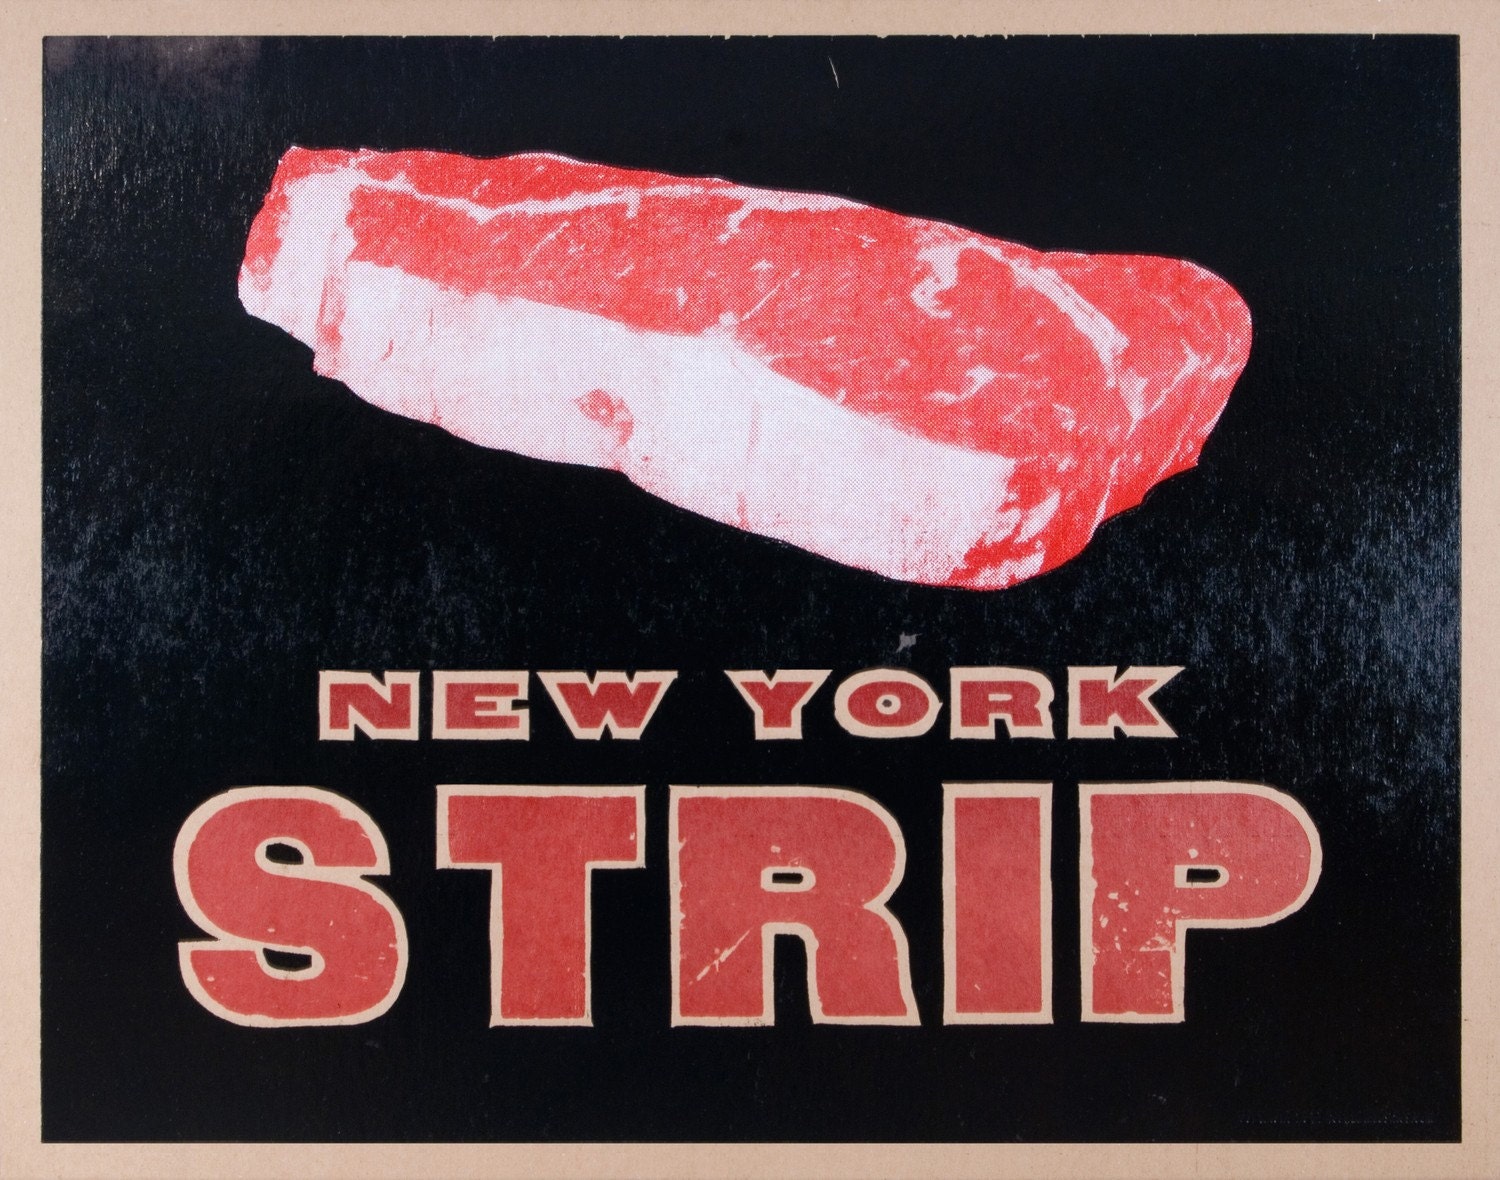
Today, I’m cooking my favorite, strip steaks, also known as a New York strip, a Kansas City strip, a club steak, a strip loin or a top loin. It’s a tender, full-flavor cut perfect for grilling, broiling or cooking in a skillet.
Look at these pretty steaks! I bought these 2 Certified Angus Beef® brand steaks from the full-service meat counter at my local United Market Street store a couple of days ago. Check out the cherry red color and beautiful marbling (little flecks of white within the red meat)!

While I like a variety of seasonings and rubs, garlic pepper is definitely my go-to seasoning for steaks and burgers. It adds a nice flavor without distracting from the meat and gives you that classic steakhouse taste. I like to season them pretty generously on both sides.

When I’m ready to start the steaks, I begin by preheating a cast iron skillet on medium high heat. Once it’s good and hot, I drop about 2 tablespoons of unsalted butter in and let it melt. You want enough to just barely cover the cooking surface. Once it’s all melty and starting to turn a little brown, put the steaks in.

In about 5 minutes, the steaks will be seared and develop a nice, pretty crust that’s going to hold all those juices in. That’s when it’s time to flip them, so the other side can do the same.

Continue to cook the steaks to desired doneness. If you’re using a meat thermometer, that’s 145 degrees for medium rare or 160 degrees for medium. (If you’re just cutting in and eyeballing them, well, they’re done when they look how you like them.) For a 1-inch thick strip steak, it’ll take about 11-15 minutes.
When the steaks have reached the desired doneness, remove them to a plate to rest while you assemble your potatoes. Here’s what the finished product will look like:

Wednesday, May 4, 2011

Beef buying basics: Quality grades

I had every intention of cooking a delicious beef meal tonight, snapping pics as I cooked and blogging about it afterwards. Really, I did.
But, plans changed and I needed to take care of some errands this evening and it just didn’t pan out. For the record, the Mr. and I did enjoy some delicious Arby’s roast beef sandwiches (his was a giant, mine a junior) and curly fries while we were out. Pretty tasty for a fast food meal.
Part of the reason I didn’t have time to cook, though, was something just as bloggable — buying meat. See, this weekend the small town we live in hosts a pretty large cook-off and my husband (and many of his friends and family members) participate. I’m also throwing my hat in the ring this year, but only as a contestant in the homemade salsa competition.
I’ll leave the meat smoking to the guys while I provide moral support, take photographs, provide the dessert and — of course — serve as a taste-tester for the steaks, brisket, pork spare ribs, chicken and goat they cook.
As we were waiting for the butcher to cut us (15) 1-inch thick ribeyes for the weekend, it occurred to me that a little lesson in beef buying basics would make a good series of blog topics. After all, while everyone loves a good steak, not everyone knows what to buy to get the desired result.
Tonight, we’ll start with the most basic in meat case lingo: quality grades. Not surprisingly, a quality grade is exactly what it sounds like — a grade given to beef based on its (you guessed it) quality. This grade is determined by a U.S. Department of Agriculture inspector and based on amount of marbling (fat within the lean), firmness, color and texture of the beef, and the maturity of the animal. These factors indicate how tender, juicy and flavorful the beef is expected to be.
While there are 8 grades of beef in the U.S., only 3 are likely to show up in your supermarket or on the menu at a restaurant. They are Prime, Choice and Select.
A prime steak has the most marbling. Most prime steaks are sold to white tablecloth restaurants, but they do show up in some specialty markets and higher-end grocery stores.
A choice steak has a little less marbling. Choice steaks are widely available in both restaurants and grocers.
A select steak has the least amount of marbling. While this does make it a leaner choice, it’s often going to be less flavorful and juicy.
But how do you know which of these quality grades you’re buying? Most often, a quick scan of the label or grocery store signage will help you determine whether you’re looking at a prime, choice or select steak. Generally, if a quality grade is not listed on the label, the steak is select. After all, if it’s a higher quality grade, your butcher or grocer wants you to know.
Where it can get trickier is with branded beef. I’ll talk more about branded beef (like Certified Angus Beef, Rancher’s Reserve and Nolan Ryan’s Beef) later, but if you’re unsure where a branded product ranks from a quality grade standpoint, ask the nice man or woman behind the meat counter, or do a little research online.
It’s also important to note that all beef sold in the U.S. is inspected (and is required by law to pass inspection), ensuring its wholesomeness. You can feel confident no matter which cut or which quality grade you choose, you’re getting a safe, nutritious product.
Have more questions about beef buying? See a Beef Lover’s Guide to Shopping or Buying Beef Q&A, both brought to you by the Beef Checkoff, or stay tuned for future Make Mine Beef posts on the subject.

Tuesday, May 3, 2011

Well, hello there.

Welcome to Make Mine Beef, where a wannabe foodie talks cattle, cooking and a little pop culture.
So, first, a little about me… My name is Katrina and I’m a writer with a passion for the beef industry. As the associate editor for a cattle industry magazine, I get to call some of the best people on Earth — cattle producers — my colleagues and friends.
That being said, this blog is not a part of my job. I’m not being paid to or asked to write about beef to the masses. (Masses? Who am I kidding? Thanks for reading, Mom.) I’m doing it because it’s a product I believe in. And, as someone who likes to rattle on about the benefits and deliciousness of beef, I needed an avenue where I wasn’t limited to 140 characters.
Sometimes I cook healthy, like today’s lunch of sirloin (Did you know sirloin is one of 29 cuts of beef that meet the government’s requirements for lean?) and veggies, and some days I’ll be making good old comfort food, like a hamburger with homemade cheese fries or the Texas favorite chicken fried steak.
But, no matter what’s on the menu, you can bet it’ll feature wholesome, delicious beef.  You can also bet it’ll be something that can be prepared in a reasonable amount of time and without any only-available-in-specialty-markets ingredients. I promise you won’t read any of my entries and think to yourself (as I have when perusing other blogs and cookbooks), “That looks great, but I have a job.”
I’ll also include a few side dishes and lots of baked goods for good measure. My love of food isn’t limited to red meat, after all.
From time to time, you’ll even read about my life outside of the kitchen. You know, writing about the cattle industry, being a new wife in a new town and all that good stuff.
So, thanks for stopping by. I hope you’ll do it again sometime soon!