Want to enlarge? Click here for a larger version.
Sunday, January 6, 2013
WebLove: The facts about beef prices
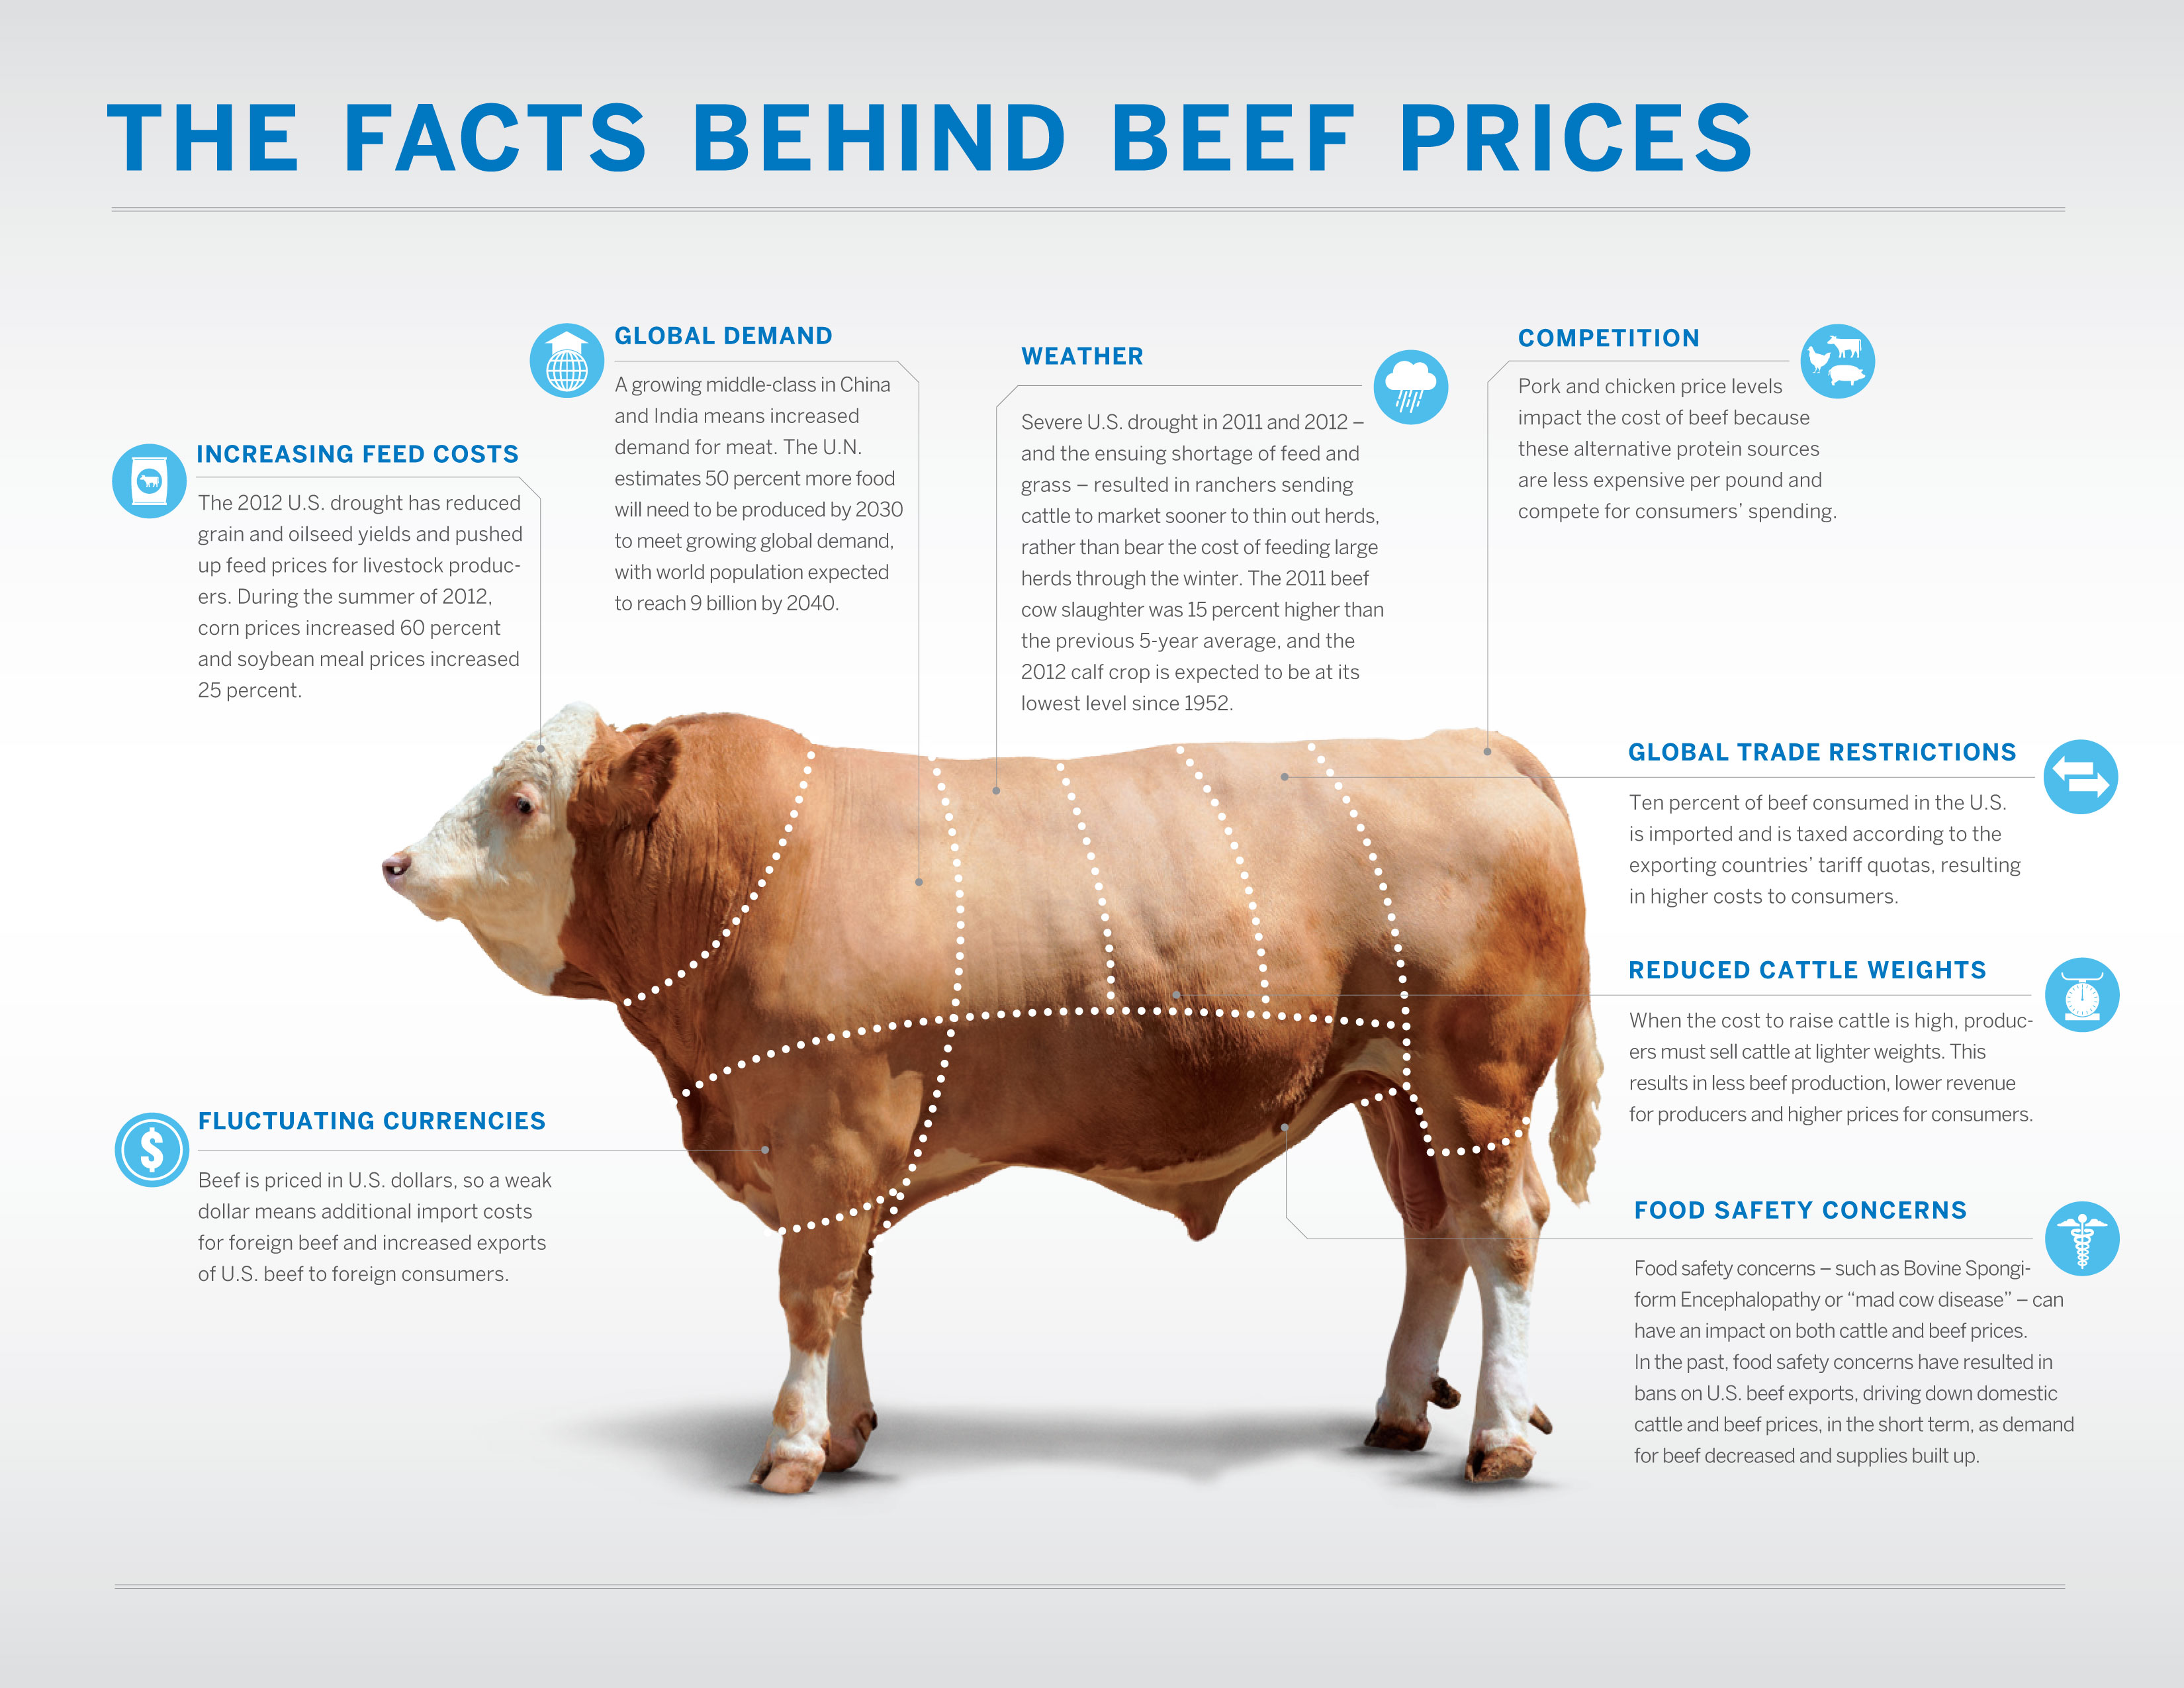
If you've been in a grocery store lately, you've noticed: Food prices are rising. Every wonder what factors influence the prices? I stumbled across this infographic from the CME Group and knew I had to share it with you all. Hope it clears up some of the mystery, at least the mystery surrounding beef prices! (To read about general food prices, click here.)

Want to enlarge? Click here for a larger version.
Sunday, December 9, 2012
Easy appetizer: Steak salad on a stick
I normally make a lot of guy food around here. But, yesterday,
with a houseful of girls getting facials and hand treatments as part of a Pink
Papaya party, I knew I needed to switch up the menu a little. (I may have also
used this as an excuse to by Gerbera daisies and fake snow-dusted poinsettias
for the table, but whatever.)
But along with the mimosas, cupcakes, cookies, cheese and
fruits…there still had to be beef. Obviously. While this was a mid-afternoon
soiree and no dinner was served, I still found a way to incorporate a little
ZIP (that’s zip, iron and protein) in the form of lean beef.
I present… Steak salad on a stick.
I recommend grilling your favorite lean beef (I used
sirloin, because I had a couple on hand), cutting into cubes and then refrigerating until you’re ready for it.
You could actually do this the day before to save time.
Then, all you need are some wooden skewers and your favorite
salad ingredients cut into skewer-friendly cubes. Lettuce, cherry tomatoes,
carrots, mushroom, onions and cheese all work wonderfully. Skewer them up and
serve with your favorite dressings. I poured Ranch and Thousand Island into mason jars to pretty it up a little. Ta-da!
Thursday, November 8, 2012
Restaurant redo: Steak ranchero with homemade refried beans
I love recreating restaurant meals at home. Especially,
quite frankly, when I think there’s 1 or 6 small changes that could make the dish
even better in our eyes. This is one of those meals.
Recently, I had a dish called steak ranchero at a Mexican
restaurant. It had all the potential in the world, but needed, in my opinion, 1
change: a thicker, higher-quality cut of beef. So, I took matter into my own
hands.
Ingredients for steak ranchero
2 strip steaks, about 1 ½ inches thick (I used Certified Angus Beef brand from the butcher's case.)
1 cup hot green salsa (I got mine from a local restaurant,
but you can also make your own or use store-bought.)
Salt and pepper to taste
1 tablespoon butter
Directions for steak ranchero
Preheat oven to 350 degrees
Heat an oven-safe skillet (I used cast iron) over
medium-high heat. Melt butter.
Season steaks with salt and pepper.
Add steaks to skillet and cook 5 minutes per side, or until just
seared.
Pour salsa over steaks and transfer to oven.
Cook another 10 minutes or until they reach desired doneness. Pour extra salsa from the skillet over the steaks or serve on the side. Serve
with refried beans (recipe follows for homemade, or use store-bought) and flour
tortillas.
Ingredients for refried beans
1 pound dried pinto beans
4 ounces salt pork, thinly sliced
1 jalapeno, sliced
4 cloves garlic, minced
1 tablespoon chili powder
Salt to taste
½ cup cilantro, chopped
2 tablespoons butter
Directions for refried beans
The night before you want to cook your red beans, soak them
in water. The next morning, drain and rinse.
Add beans, salt pork, garlic and chili powder to large pot.
Cover with water.
Boil about 2 hours over medium heat or until tender.
Beans should always be completely covered with water so if
you need to add a little while they cook, do so — but be sure you add hot
water.
Add jalapeno, cilantro and salt, and then reduce heat to
low and simmer another 30 minutes or even all day.
When you’re ready to refry them, heat a cast iron skillet
over medium heat.
Melt the butter.
Drain beans, removing broth, salt pork and jalapeno slices.
Add beans to hot skillet and mash with a potato masher until
desired consistency. Cook about 3- to 5- minutes. If desired, you can sprinkle
them with a little shredded cheese and allow it to melt.
*Red bean
recipe courtesy Tom Perini and from “Cooking the Cowboy Way” by Grady Spears.
Refrying goodness courtesy of Katrina and Google.
Friday, October 19, 2012
Beef on the road
The Mr. had a conference to attend in San Antonio this week
(where he won an award — sweet!) and I decided to take advantage of this whole
being-your-own-boss thing and tag along. After all, it’s nice to get a little
change of scenery even if you are working all day from the hotel room. I mean,
who else wishes someone would make your bed and clean your tub every time you
go to lunch?
We did some pretty good eating en route and once we got
there. After all, we have to take advantage when we’re some place with more
than one restaurant to choose from!
Here are a few of the highlights…
On the (long) way down there, we stopped along the way at a
restaurant I’ve been hearing about since high school. Seriously. And you know
what? The Beehive Saloon in Albany, Texas, was worth the wait. We got chicken
fried steaks on the lunch, which came with some of the best seasoned fries ever,
some good dark bread and a trip to the salad bar. I forgot to take a picture,
but you can check it out here.
That night, we went to Hooters. I know, I know. It sounds
weird. But Hooters became a tradition for the Mr. and I when we were dating,
and we’ve since started a goal to eat at one in every state. We’re at 8 states
right now — not bad considering we’ve only known each other 3 years and been
married 2. Oh, and fellow beef advocates, you’ll be interested to know I’ve
never had chicken there. Who needs to, with such an awesome burger and curly fries?
Wednesday at lunch, I headed to Texas Land and Cattle for
one of my favorite dishes I rarely get to have since I don’t live anywhere near
one anymore. It’s their smoked sirloin and it’s super peppery and very
delicious.
That night, we drove to the south side of town to meet one of the
Mr.’s good friends who lives about an hour and a half south of the city for dinner
at a LongHorn Steakhouse. I was happy to see flat iron on the menu. Even though
it was a little overcooked, it was still quite good.
And even better? The dessert. This Chocolate Stampede was
one of the best desserts I have had in a while. And it was so big that 3 of us
ate less than half of it!
It was great to eat some good beef on the road, but it’s
also great to be home. You know, aside from the lack of housekeeping service…
Sunday, October 14, 2012
The Mr.’s favorite fried egg cheeseburger
The “add a fried egg” option seems to be popping up on
burger menus all over these days, and it’s something the Mr. almost always
takes advantage of when available. So, tonight, I decided to make him a fried
egg burger here at home and share it with you.
Here’s what you’ll need to make his favorite version, which
features bacon, lots of cheese and an egg over medium:
½ pound 85/15 ground beef, seasoned generously with salt and
pepper and formed into a patty
1 Sara Lee Hearty and
Delicious sesame seed bun
1 slice American cheese
1 slice Swiss cheese
1 slice Cheddar cheese
2 slices thick-sliced bacon
1 egg
3 tablespoons butter
Miracle whip
Directions:
Preheat griddle to
350 degrees.
Add patty. Cook
until seared on one side, about 5 minutes. Flip.
Add cheese slices.
Cook bacon.
Cook hamburger to
160 degrees for medium doneness, which will take about 8- to 10- more
minutes after the flip for a thick, half-pound patty.
Let rest for 3- to
5- minutes.
Butter the bun with
1 tablespoon of butter and toast on griddle.
Heat a small
skillet with 2 tablespoons of butter over low heat. Swirl the butter around so
the pan is completely coated.
Crack egg and open
over the pan. Increase heat to medium.
Allow the egg
whites to cook until solid around the egg. Flip and cook another 60 seconds or
so. Remove from heat.
Add Miracle Whip to
inside of bun.
Add patty, then
slide egg over the top. Place bacon slices on top and close with top half of
bun.
Friday, October 12, 2012
The worst of Pinterest: Part 1
A couple of weeks ago, I brought you The best of Pinterest: Part 1. It was filled with Oreos and other goodness and hopefully gave you a few yummy or crafty ideas. But I can't forget the epic fails, so that's what this post is about. My only regret is that I never photographed the disasters. I guess you'll just have to take my word and not attempt these at home.
The pin:
The claim: Use spray paint and a stencil to make a monogram outdoor mat.
The result: Terrible. I'm pretty handy with a can of spray paint, so maybe I bought the wrong kind of mat (though it looked just like this one to me). But, it ran and just generally looked weird. Also, for the price of a plain mat, stencil and spray paint, you can pretty much buy any "finished" mat you'd like.
The pin:
The claim: Refreshing, easy-to-make, 105-calorie watermelon margaritas.
The result: Technically, they didn't lie. They are easy to prepare and only contain 105 calories. What they don't tell you is the serving size is quite small (thank of it more as a large shot than a drink) and they taste terrible. I was really disappointed, too, because On The Border's watermelon margs are one of my favorite things on the planet.
The last pin I'll discuss today was so bad I immediately removed it from my board, in hopes none of my followers would make the same mistake I did. Now, I can't find it anywhere. (Maybe everyone else did the same thing after making it.) It was for Texas Roadhouse cinnamon honey butter. The pic featured a frame photo of a couple next to a jar of the stuff. Well, you might think you can't mess anything up that contains honey, cinnamon and butter, but with the random amounts given in this pin, you could. I'll go back to just making my own by winging it, or else buying the Land o Lakes stuff.
The pin:
The claim: Use spray paint and a stencil to make a monogram outdoor mat.
The result: Terrible. I'm pretty handy with a can of spray paint, so maybe I bought the wrong kind of mat (though it looked just like this one to me). But, it ran and just generally looked weird. Also, for the price of a plain mat, stencil and spray paint, you can pretty much buy any "finished" mat you'd like.
The pin:
The claim: Refreshing, easy-to-make, 105-calorie watermelon margaritas.
The result: Technically, they didn't lie. They are easy to prepare and only contain 105 calories. What they don't tell you is the serving size is quite small (thank of it more as a large shot than a drink) and they taste terrible. I was really disappointed, too, because On The Border's watermelon margs are one of my favorite things on the planet.
The last pin I'll discuss today was so bad I immediately removed it from my board, in hopes none of my followers would make the same mistake I did. Now, I can't find it anywhere. (Maybe everyone else did the same thing after making it.) It was for Texas Roadhouse cinnamon honey butter. The pic featured a frame photo of a couple next to a jar of the stuff. Well, you might think you can't mess anything up that contains honey, cinnamon and butter, but with the random amounts given in this pin, you could. I'll go back to just making my own by winging it, or else buying the Land o Lakes stuff.
Wednesday, October 10, 2012
Beef and apples: Perfect together for fall
(Note: this post was almost titled “How about them apples?”
but then I remembered it wasn’t 1997. I’m a little ahead of Uncle Si on my
catchphrase expiration knowledge. Speaking of which, who else is super excited
about the return of Duck Dynasty
tonight? But, I digress…)
One of the perks of my jobs is getting cool emails in my
inbox like the one I received this morning from the Cattlemen’s Beef Board. Amidst
news on the South Korean market and producers profiles was a feature called Ingredient of the Month: Apples, which I
knew immediately I needed to share with you all.
So, if you love apples and want to whip up some fallish beef
dishes, why not try one of these?
Friday, September 28, 2012
The best of Pinterest: Part 1
I’m not usually one to completely rip-off someone else’s
idea, but when I complimented fellow blogger and social media friend Crystal
Blin of Crystal Cattle on her recent Pinterest recipe review post, she told me
I just had to do one of my own. So, it’s with complete permission that I present
my own list. This post, focusing on the good times, is just part 1. Be sure to
stay tuned for my Pinterest disasters coming up next…
Bake some
vanilla extract for a yummy-smelling house.
The pin: Put two caps
full of vanilla extract in a coffee cup, then place it in the oven at 300
degrees for one hour. Within 20 minutes the whole house smells like Heaven.
It's actually a common Realtor trick.
Repinned from: My first friend.
Like, ever. Her name is Lane and though we haven’t seen each other in probably 25
years (despite unknowingly attending the same college), we’re social media
buddies and I’m forever grateful she found this gem. Because let me tell you — it
works!
Result: The whole house (OK, so my
house isn’t that big) smells completely delicious for hours. Also great at absorbing
cooking odors.
Turn cheap
frames into versatile displays that are easy to switch out.
Repinned from: The website
Result: Awesome gifts on the cheap. Here’s what mine looked
like:
Cookies ‘n Cream Oreo Fudge Brownies
Repinned from: Deliciousness
Result: Um, perfection. Super easy, too. Probably my
favorite Pinterest-inspired dessert yet, and I’ve tried a lot.
Cookies and Cream Ice
Cream Cake
(Can you tell we like Oreos?)
Repinned from: Someone random
Result: Amazing. I did make a couple of adjustments
— I used store-bought ice cream, for one. (After all, this cake is already a 2-day
process. Who has time to churn up some homemade ice cream?) Also, I used Oreo Ultimate Chocolate
Creme icing instead of hot fudge to decorate it. It looked like this:
Texas Sheet Cake
Cupcakes
Repinned from: Someone random
Result: I actually just made these for the first time tonight,
but I’m already a fan. I’m also sure why I never thought of this before. I
mean, I love sheet cake and I love cupcakes…seems like a no-brainer. I will say
don’t skim over that part where it warns you to not overfill them. These people
know what they’re talking about and I might have gotten a little chocolate on
my hands. And shirt. And face.
Wednesday, September 5, 2012
WebLove: What your favorite steak says about you
![]() |
| Courtesy of FoxNews.com |
What about you?
Friday, August 17, 2012
Frito taco pie
On occasion, while planning my trip to the grocery store, I’ll ask the Mr. if there’s anything he wants me to cook in the next few days. Sometimes he has suggestions, sometimes he doesn’t. As a journalist, I always have follow-up questions when he doesn't.
“Is there anything you like I don’t make enough of?” I asked, not too long ago.
“Stuff with Fritos in it,” he said.
Challenge accepted.
The first meal was a knock-off of Sonic’s half hot dog, half Frito chili pie. You know, basically a chili cheese dog with a bunch of Fritos on it. The second meal (featured below), however, was my own spin on the Frito chili pie. It’s much faster to make than the original since spicy taco meat is subbed for chili.
Ingredients
1 pound ground beef
1 packet hot taco seasoning (or mild, if you prefer)
Water
Fritos
Taco sauce
Mexican blend cheese
Pickled nacho sliced jalapenos
Sour cream (optional)
Directions
Preheat oven to 350
Brown ground beef on the stovetop over medium-high heat. Drain, if necessary.
Mix taco seasoning and water according to package directions. Simmer about 10 minutes, stirring occasionally.
Arrange Fritos on individual plates, topping with meat, taco sauce, cheese and jalapenos. Repeat.
Bake at 350 for about 10 minutes or until cheese is melted.
If desired, top with sour cream.
The Mr.’s looked like this:
Monday, August 13, 2012
Beef love in print, chipotle flank steak recipe
I’m a complete magazine junkie. So, it’s probably no surprise that I get just plain giddy when beef is being featured in one of the many mainstream magazines I either subscribe to, pick up at the grocery store or airport or glance at while I’m getting my hair cut.
When this month’s Redbook arrived, I was happy to spot 2 beefy mentions.
1. This ad from the Beef Checkoff, featuring a yummy-sounding recipe and a photo and note from one of the many real ranching families who feed the world. Even better, I know this family and they have a tremendous love for the land and dedication to the industry.
2. This fun fact about Guy Fieri. While Redbook may have given the credit to the eggplant he didn’t want, it’s important to remember what he did want: steak.
Sunday, August 12, 2012
CFS minis
Me: “Have you ever had the chicken minis at Chick-fil-A? I’m thinking about doing those with beef.”
The Mr.: “Do you think I would ever order anything with 'mini' in the name?"
Point taken.
That’s why I didn’t tell him what I was thinking of calling these. But, mini or not, they are quite substantial little treats equally suited for breakfast, lunch, dinner or parties. As a substitution idea, you could also make them with biscuits for a different spin.
Ingredients
1 package cube steak
Rhodes frozen white dinner rolls (1 per patty, see below)
1.5 cups buttermilk
12 ounces beer
2 eggs, beaten
2 cups flour
Coarse sea salt
Coarse black pepper
Cayenne pepper (optional)
Garlic powder
Vegetable oil
Directions
Let rolls rise according to package directions. (I’m a fan of the quick method, which involves cheating a little bit with a warm oven and some boiling water.)
Cut cube steaks and form into roll-size patties. I found I could make 2-3 patties per cube steak, but this will vary greatly depending on the size of the cube steaks you’re working with.
Pour flour on a plate and season generously with the spices. Mix it around and add a little more seasoning.
Mix buttermilk, beer and eggs in a bowl.
Dredge patties into the dry mixture, into the wet mixture and then back in the dry. Place on a plate you’ve sprinkled with flour and place in fridge until you’re ready to cook them.
Heat vegetable oil in a heavy skillet over medium-high heat. You’ll know it’s hot enough when a flour piece rises quickly to the top.
Add patties to the oil carefully and cook about 3 minutes per side or until nice and brown. (Cooking time will vary based on size of patties, oil depth, how many you are cooking at once, etc.) Drain on paper towels.
While they are cooking, bake rolls according to package directions. I like to put just a touch of butter on top of each before I start baking them.
When rolls are done, remove from oven and allow to cool about a minute before splitting. I didn’t completely separate mine, leaving a little bit of a pocket to stick the steak in. Slide the steak in, and repeat with remaining rolls. If desired, serve with gravy for dipping. (Click here for my favorite gravy recipe.)
Ours looked like this:
Saturday, August 4, 2012
Corona con lima marinade
(This post brought to you by whoever left a Corona in our fridge. Title courtesy of Gary P. Nunn.)
Ingredients
12 ounces Corona
2 generous squirts of lime juice
5 garlic cloves, minced
Sea salt
Coarse pepper
Garlic powder
Directions
Season 1-2 pounds of beef with salt, pepper and garlic powder to taste. Place in Ziploc bag.
Add beer, lime juice and garlic cloves.
Refrigerate for 2-8 hours.
Remove beef and pat dry. If desired, add more of the dry seasonings.
Cook as desired.
This marinade is perfect for less tender cuts you want to throw on the grill!
Friday, July 27, 2012
WebLove: Vittles and Bits’ Cheesy Bacon Oven Chips
I was on Pinterest last week when I came across a photo of a
side dish from Vittles and Bits that I knew I had to make immediately. (Click here for the recipe.)
| Photo courtesy of vittlesandbits.blogspot.com |
Doesn't that look amazing?
Now, granted, it was part of some list of French fry alternatives
that frankly I found offensive. Avocado fries are not fries. Zucchini chips are
not chips. Let’s call a spade a spade here, folks. But these looked so good I
could put aside the fact that they made such a list and give them a try.
We liked them. A lot. So much I thought I’d share with you guys.
I will say that, next time, I will slice them a little thinner since mine weren’t quite
as chip-like as I would have hoped. But they were still really good. Also, I
skipped making the sauce because we’re not big on chipotle — the Mr. preferred
regular ranch and I’m a ketchup girl.
They’re the perfect complement for a steak or burger, and I highly recommend them. Hope you enjoy them too!
Sunday, July 8, 2012
7 cooking tips for July
The last 2 months have been crazy for the Mr. and me,
something that’s glaringly obvious if you look at the lack of posts on the
blog. Between our jobs, travel to weddings, showers, meetings and family functions, puppy
kindergarten for Vegas, and just general summer busyness, the blog has definitely
taken a hit. (Though those of you who follow Make Mine Beef on Facebook know beef consumption and love is just
as high as ever around here!) But, I hope to turn that around this month and
can’t wait to share lots of goodies with you soon.
When I hosted Make Mine Beef’s live Facebook chat a few
months ago, you guys were full of awesome ideas for future content. And, just
because some of those ideas haven’t shown up on the blog yet doesn’t mean they aren’t
coming! I hope to bring them all to fruition during the next few months. And
today, I’m using one of those ideas and sharing some good old-fashioned cooking tips.
Nothing to revolutionary here — just a few things I’ve picked up that might
possibly help someone else, too.
So, without further ado, Make Mine Beef’s 7 random cooking
tips in honor of the seventh month:
Dry meat browns
better. I’m only somewhat embarrassed
to admit I learned this from Julia Child. Except not so much from her, as from the movie Julie and Julia. Ever since, I’ve patted
my steaks dry with a paper towel before seasoning them. Who says you can’t
learn anything from the movies?
Water + vinegar +
baking soda works wonders on the stickiest, nastiest pots and pans. I
learned this one via Pinterest, and it’s one of those things from Pinterest that
actually works. You know, unlike the “just like Texas Roadhouse cinnamon butter”
recipe that completely ruined my day that time. If you have a pot or pan that
has some burnt-on-food stuck to the bottom or sides, there’s no need to scrub
and scrub and scrub. Just fill it about halfway up with water, add a few
splashes of white vinegar and return to the stove on medium-high heat until it
boils. Remove from heat, sprinkle in some baking soda and it will scrub away
much easier. Love this for those times I wasn’t paying enough attention to a
sauce and end up with a mess.
Use the grill’s heat
to keep it clean between uses. This is a tip from my mom, a master griller.
After taking your steaks or burgers off the grill, turn the heat up a little
and leave it on for about 15 minutes. It will “burn off” a lot of the yuck and
make your grill much easier to clean. Tip within a tip: set a kitchen timer to
remind you to turn the grill off, or else you’ll think about it 3 hours later —
or the next day — when you’ve run out of propane.
Moist cakes, brownies
and other baked goods every time? It’s as easy as water. I learned this one
from my grandmother. Anytime you bake something sweet, especially something
that has a tendency to dry out a little, just cook it with a pan of water
underneath. I always put a cake pan full of water on the lower rack and let it
heat up as the oven preheats. The steam from the lower rack will keep whatever
is cooking on the top rack moist and delicious. This tip is the best thing to
ever happen to my brownies!
Disposable pans are a (insert my maiden name here) family tradition. This one really needs no explanation. Disposable pans are fantastic
and probably the biggest time-saver ever. You know, until my dreams of a
disposable stovetop and self-cleaning kitchen are fulfilled.
Crisco is much better than oil for seasoning cast-iron skillets. Again, thank you Pinterest. How did I never know this before? Old
school Crisco works about a million times better than regular oil when
seasoning cast-iron skillets. Just smooth some on a hot, clean skillet using a
paper towel and you’re all set. It soaks right in and creates an awesome
surface for the next meal.
Dawn is the perfect
degreaser — for clothes. If you’re like me, you get an oil splatter on your
clothes almost every time you fry. While an apron works wonders, I’m pretty
good at finding the one uncovered spot and getting grease there. But, recently I learned a super easy tip that works
fantastically. Just pre-treat any grease spots with a little Dawn (I always pre-treat
while I am still wearing the clothes so I don’t forget) and voila… It almost
always washes out.
What are some of your favorite kitchen tips?
Thursday, June 14, 2012
Grilled cheese bacon burger
The Mr. likes Carl’s Jr. A lot. So, last week, when I was
headed home from puppy kindergarten (yes, that’s a real thing) with Vegas and
asked him if he’d like me to bring him some dinner since he was working
late, it was no surprise he requested a double western burger and criss cut
fries from the chain.
In his very greasy (not that there’s anything wrong with
that) bag was a coupon for the chain’s newest creation, the grilled cheese
bacon burger. I could tell he was intrigued by the way he said, “Hmm.”
Being the competitor that I am (he’s already accused me of
trying to “win” puppy kindergarten, which, of course I am) I took that as a challenge. "Challenge accepted," I said in my best Barney Stinson voice.
And so I present, Katrina’s grilled cheese bacon burger.
Made especially for the Mr. but perfect for sharing with your cheese-loving
sweetheart as well.
Ingredients
½ pound of 85/15 ground beef
Garlic pepper
Sea salt
3 pieces of thick-sliced bacon
2 slices American cheese
2 slices Swiss cheese
2 slices cheddar cheese
2 slices of Texas toast, buttered on one side
Mayo or Miracle Whip
Directions
Place ground beef in a bowl, season well with garlic pepper,
mix it up with your hands and repeat until it’s well seasoned throughout.
Form into a patty and return to fridge.
Preheat an electric griddle to 350 degrees.
Preheat the oven to 300 degrees.
Place Texas toast, buttered side down, on a foil-lined cookie
sheet. Add 1 slice of each type of cheese to each slice of bread.
Add hamburger patty to griddle and sprinkle lightly with sea
salt. Cook 5- 6- minutes or until well-seared and flip. Cook another 6- to 8-
minutes or until desired doneness. (Cooking time will vary based on thickness
of patty.)
Place cookie sheet in the oven and cook about 10 minutes.
Then crack the door and set oven to broil for 1-3 minutes to finish it off. The
cheese should be very melty, but not brown.
While the hamburger and bread is cooking, prepare the bacon
according to package directions.
Place the hamburger patty on one piece of bread. Top with
mayo and bacon and add second piece.
The Mr.’s looked like this:
Sunday, June 3, 2012
Oven-roasted tri-tip with green chile-jalapeno mashed potatoes
As you may remember, my friends at Certified Hereford Beef hooked me up with a couple of AMAZING tri-tips earlier this month. The first
one I grilled, but for the second one I thought I would show how versatile this
cut is by oven-roasting it. After all, sometimes grilling just doesn’t fit the rest of your plan! I
also wanted to experiment a little with my mashed potatoes and make something a
little Tex Mex-y. Here’s how you can duplicate both.
Oven-roasted tri-tip
Ingredients
1 tri-tip
Coarse sea salt
Coarse black pepper
Garlic powder
2 tablespoons unsalted butter
Directions
Pre-heat oven to 350 degrees.
Sprinkle both sides of the meat with the seasonings.
Heat an oven-proof Dutch oven on the stove to medium-high heat.
Add butter to Dutch oven and allow to melt thoroughly.
Add tri-tip and cook 5 minutes per side to sear.
Transfer to oven and cook 25- to 35- minutes or until an
instant-read thermometer indicates desired doneness. (I like to pull mine out
before it’s quite to the desired temp since it will continue to cook just a
little more while it rests.)
Move tri-tip to a plate and tent with foil. Allow to rest about
5 minutes before slicing.
Green chile-jalapeno mashed potatoes
Ingredients
1 baking potato
1 head of garlic (I use most or all of the cloves, but if you
don’t love garlic the way we love garlic, just reduce the amount.)
Olive oil
Sea salt
Coarse pepper
¼ cup heavy whipping cream
5 Tbsp. unsalted butter
2 jalapenos, stemmed/seeded and then minced
½ can chopped green
chiles
½ cup sharp cheddar cheese (optional)
Directions
To the roast the garlic:
Cut the top off and discard, exposing the cloves.
Brush or spray the exposed cloves with olive oil and sprinkle
with sea salt and coarse pepper. Wrap in foil and roast in a 350 degree oven
for 30-45 minutes. (You can do this up to several days ahead of time and
refrigerate it, or do right before you need it.)
When you’re ready to cook the potatoes (about 40 minutes before
you’re ready to eat dinner):
Wash and cut the potato into 4 pieces. (You can peel it if you
want, but I prefer skin-on.)
Place the potato pieces in a pot and cover with water. Squeeze
the garlic cloves into the pot. Bring to a boil on stove and cook until tender,
about 35 minutes or so usually.
While the potatoes are cooking, add the heavy whipping cream and
butter to a saucepan and heat on medium. Allow to reduce. The process only
takes about 10-15 minutes, but it won’t hurt to start it when you start the
potatoes and just reduce the heat or even turn it off toward the end.
When potatoes are done, drain and pour back into pot or into a
mixing bowl. (I like to use my stand mixer if it’s not already in use.) Add the
butter and cream mixture a little at a time (you probably won’t need it all,
especially if you’re like me and like your mashed potatoes a little on the
dryer side), add the peppers and cheese in, and mix using an electric mixer until you’ve reached your preferred
consistency. Add some sea salt and coarse pepper and give it another quick mix.
Our dinner looked like this:
Friday, May 25, 2012
McCormick steak rub
A while back, I mentioned my friends
at the Black Ink Basics blog sent me a little prize package for participating
in one of their Facebook polls. It was full of some great stuff — a magnetic notepad
(I love notepads!), a really good
instant-read meat thermometer and a container of steak rub created for
Certified Angus Beef by McCormick. Not only was the steak rub delicious, but it
came with a recipe for duplicating it once the canister was empty. How cool is
that? And since the Mr. and I both thought it was pretty awesome on our ribeyes
tonight, I thought I better share it with you, too.
¼ cup kosher salt
2 teaspoons McCormick ground black
pepper
1 teaspoon McCormick paprika
2 teaspoons onion salt
1 teaspoon garlic powder
1 teaspoon ground coffee
½ teaspoon McCormick ground thyme
Hope you all have a safe and happy Memorial
Day weekend, and get to enjoy some great beef with your family and friends!
Subscribe to:
Posts (Atom)